Welcome

LilyPadBioPic-2
Follow on Bloglovin

Followers

1st Layout Published

On-Line Mag.Pub.

Preview

My Staedtler Pub.

Preview

An Amazing Experience

Thanks Jill

Featured on Inspired By
Shining the Light Challenge Award

Photography Tips

Photography Tutorials
2010-2014. Powered by Blogger.
Showing posts with label S5458 Florentine Pattern/Hero Arts. Show all posts

December 30, 2010

Wishing You A Merry Christmas


Merry Christmas
From Our House To Yours!


Yes, some may think that this greeting is a little late, but technically it isn't!  Being a true Newfie and celebrating the traditions of that province, we celebrate 12 Days of Christmas. So Christmas really begins on Christmas Day and ends on Old Christmas Day (or Epiphany ) - Jan. 06th!  I always loved this about Christmas when I lived home because it gave us 12 days to truly celebrate the true meaning of Christmas - being with family, making some fun memories, experiencing the season of giving, and most important, to celebrate our Saviours birth. 

I do want to share some cards as well. These were made when I took the class over at 2Peas for Holiday Thinking Inking.  I had so much fun making these and really needed to share before now, but I have had a sick kid and hubby.  Then I got sick with the stomach flu bug too.  Then everyone was doing well, but then I woke up on the 16th with a head and chest cold. Soooo therefore, things were delayed, but we were all ready for Christmas day, thank goodness!  Lol!


This card was made for the Holiday Thinking Inking over at 2Peas and for Hero Arts Contest. I loved the way this Paint Resist Technique turned out. I cannot believe how much texture this gave the card. I actually applied white acrylic paint on my Hero Arts stamp and then stamped on white cardstock.  Once it dried, I then blended several Distress Inks on various parts of the background. It was then added to wood grain paper and then lace was added to the lower part of the card. I also cut out Happy Holidays in dark chocolate brown with my Cricuit Machine and adhered to the top portion of the card. 

This Hero Arts Florentine pattern was the great stamp that I used and I will add that it would be better to use Ranger Paint Dabbers.  They are specially made to stay wet longer. And because of this your paper will not stick to your wood block.  Yup, it happened to me the first try, so I had to pick up on my speed when removing the cardstock the second time around. You can purchase it for yourself!


And here is another card that I made using Stamping Up Sentiment and Poinsettia stamps.


This card was made with the Textured Paint Stamping technique on the mini Poinsettias. I actually used a make-up brush to run through the paint once it was added to each stamp. Really cool effect. I also used Hero Arts Polka Dots background stamp on the lower portion of this card. I just love how this turned out!


Now before I go I would like to share this one layered card that I made for a card challenge in my Hero Arts Flickr Group.  It is using the ever wonderful stamp set from Sweet & Sassy.  We were to make a card for a 90 Minute Scramble and the card was to be only one layer. Now we could layer our stamping but not other papers.  Seeming that I celebrate the birth of Christ for Christmas, I decided to use this stamp from Sweet & Sassy that I won in a Blog Hop of theirs back in October, for this fun challenge.  The Greatest Gift Clear Stamp Set.  I also used this Hero Arts Bold Florish stamp with this card.


Now making a one layer card was very difficult for me, but I played around with some techniques that I learned from my friend Jill. I am happy with how it turned out, but would still love to fix it up some more with dark blue ink and to add more darker colours around the couple instead of that Yellow hue. I wanted it to appear that there was an Holy Light shining down upon them, but it turned out that the colour of the distress ink and watercolor yellow was almost the same. Oh well, I will have to give this another try I guess.   I was going for a magical night in Bethlehem scene and wanted it to portray the special meaning behind the birth of Jesus.  Now that the card is completed I have since thought that I should add 3 crosses in the hills in the background to symbolize not only the birth of Christ, but His sacrifice for us.  I didn't get to add it, but will try this again for sure and will make that a part of the drama unfolding in this card scene.  Anyway, this is what I came up with. Hope you like it!


May the Christ of Christmas
fill your heart & home with love, joy and peace
that will last beyond the season.


Thanks so much for dropping bye and for being here with me along my blogging journey.  I so do appreciate you and your company!  Praying that your Christmas is and was a season filled with much love, happiness and most important, wonderful joyous memories to share for years to come.

Blessings to you my blogging friends.
Dana

October 31, 2010

Holiday Thinking Inking Week 2

Hi Everyone:
Just wanted to share with you the cards that I made for the challenges that were presented to our class in the Holiday Thinking Inking Class with Jennifer McQuire.  Please do not feel that you can't take part because you still can. You may have missed a few classes for chances to win prizes, but you can still submit cards using those techniques along with this week's techniques.  Just make sure to submit it to week 4 okay.  It needs to be uploaded to their gallery by Nov.1st.  It is always great to win scrapbooking supplies, but I have to say that I am just as happy to learn new ways to use my stamps and to get more bang for my buck.  So here are the cards that I made, including close-up shots.

The first technique that Jenn taught us was called Block Background. This is when you use an acrylic block to make your very own watercolored background.  This was a little tricky but after a few tries I got what I wanted!  These techniques work the best with Ranger Distress Inks by Tim Holtz.  Why you might ask?  Well they are made so that you can use them like watercolours,  which really comes in handy when doing a technique like the one used in this card.  I had a friend ask about exactly how this is done so I will try my best to explain it to you.  You take any size acrylic block and you cover it with various distress ink colours. Once you have the desired amount, you than spritz it with water. Depending on the effect your going for, you can either spritz close to the surface, which will give a more pooled water effect, or spritz further away, which is what I have done here. The closer the bigger splotches, the further away, the smaller the splotches.  Hope this helps.


Close-up Shot!  Sorry about the frayed ribbon here, but my scissors became dull apparently! Lol!


I used Broken China distress ink and Stampin Up chocolate chip brown. The stamps used were from Autumn Leaves, Stampin Up & Hero Arts.  I really love how this turned out.


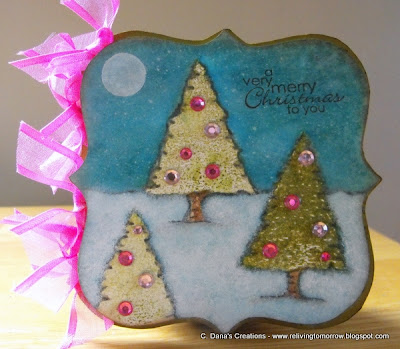
This next card maybe small in size but there were many techniques used here. The background was first watercoloured in Broken China. Then splattered with watered - down white stamping ink. The trees were then stamped in a technique that Jennifer McQuire calls Generation Stamping. This is where you ink your stamp once and then continue to stamp until all the ink is gone. This is the technique used here to stamp the trees.  I then dipped the end of my Mister bottle in white paint to make the moon.  I then shaded around and above the trees to create the feel that the trees were in front of the snow and sky.  I then did a Painting technique to create the snow called Mopping/Stippling which gives such great texture.  I then stamped the cling dots to the green background and distressed the edges.  Liquid Pearl was added to water in my Mister bottle and then I misted the entire card.  I then added the sentiment and ribbons. This was so much fun to create!


Close-up Shot!


This shot really shows how wonderful spritzing Liquid Pearls can be on your cards.
It gives such a warm and glimmery effect.


Now this next card was one of my favorite cards to do.  Here I did the "Bleeding Technique" that Jenn taught us.  I decided to do it on a bigger stamp surface and I am so glad that I did.  I used this wonderful Bold Flourish on my card.  I just loaded the stamp up with different fall colours and stamped it on my watercolour paper. Then stepped back a little and spritzed it with my Mini Mister. The effect was amazing.  I then added Ultra Embossing Powder to it to give it more dimension and then inked all around it.  My background was stamped with the cling dot stamp and inked around the the edges and center to tone down the brightness of the paper.  I so love the colours here and that ribbon really helped to make this card look elegant.


Close up to show the bleeding of inks and to show embossed texture.


These cards were so fun to create and the fun is not over yet.  We are on our fourth week now and I will share pics of  weeks three and four with you early this week.  I trust that you are all doing well and spending some time together enjoying the fall weather.  Thanks for dropping bye and hope to see you again soon.

Hugs & Blessings
Dana

October 13, 2010

Holiday Thinking Inking With Jennifer McQuire


I am so excited to share with you this class that I am taking over at 2Peas.  It is a class with Jennifer McQuire one of Hero Arts very own Design Gals.  And let me tell you that she rocks when it comes to card making and doing video tutorials.  Many of you may remember her as the the mastermind behind the Cards For Kids card drive and she still is excepting cards bye the way.  Week one is over now and we are into our second week in this class.  But don't worry you can see all the challenges here.  Did I mention that this is all free. Yup!  That is right my friends!  Free!  Gotta love it because you don't get many things for free anymore!  Of course with every class or challenge at 2 Peas there are always prizes and give aways.  So be sure to check it out and make sure to take a peek, if you can, on all the supplies that are sale.


Also, this month is stamping month at Two Peas and there are so many challenges to chose from.  Click here to see all of the challenges.  I actually combined some of my challenges even though I am not sure if that is allowed.  I better check that out before I get into trouble. Lol!  There are prizes and giveaways here as well.
Okay I wanted to share with you two of the cards that I submitted at 2Peas for the Holiday Thinking Inking Class and for one of the Stamping Challenges for this Stampfest at 2Peas.

HolidayThinkingInkingProject2-2

reindeer( Better View)

Making these cards were so much fun and I can't wait to get to try these techniques again.  Before I go I want to tell you that my friend Jill at "Inspired Bye" is featuring my work on her blog this week.  I was floored when she asked if she could do this.  All I could think is why would she be inspired by little old me when her work is amazing.  Here is a little sample of what her cards look like.  You will be drooling I can guarantee!

Inspired by...Dana

See, I told you that you would drool!  Isn't this beautiful!  She was inspired bye one of my cards to make this, so be sure to check out what she did so far this week.  She is an amazing cardmaker for sure!  Thanks sweetie!

Okay that is it for me until tomorrow when I will share with you my goodies from my Hero Arts win!  I will take a picture later today and put it up tomorrow.  I also will try to share the cards that I will be making later this afternoon for Week 2 of Holiday Thinking Inking! 

I trust that you all had a great weeknd and an extra special long weekend to all of those Canadians who just celebrated Thanksgiving. We have so much to be thankful for and I am thankful for you, my followers.

Have a great day!
Hugs!
Dana

Copyright Notice

All the contents of this blog including but not limited to designs, concepts, and photographs are COPYRIGHT 2009-2014 Dana Colbourne. I have put a lot of work in these creations and would appreciate that you use them for inspiration and enjoyment. They are for personal use only and they are not to be copied or used for publications or contest. Thanks for stopping by and supporting me on this fun journey!