Welcome

LilyPadBioPic-2
Follow on Bloglovin

Followers

1st Layout Published

On-Line Mag.Pub.

Preview

My Staedtler Pub.

Preview

An Amazing Experience

Thanks Jill

Featured on Inspired By
Shining the Light Challenge Award

Photography Tips

Photography Tutorials
2010-2014. Powered by Blogger.

December 30, 2010

Wishing You A Merry Christmas


Merry Christmas
From Our House To Yours!


Yes, some may think that this greeting is a little late, but technically it isn't!  Being a true Newfie and celebrating the traditions of that province, we celebrate 12 Days of Christmas. So Christmas really begins on Christmas Day and ends on Old Christmas Day (or Epiphany ) - Jan. 06th!  I always loved this about Christmas when I lived home because it gave us 12 days to truly celebrate the true meaning of Christmas - being with family, making some fun memories, experiencing the season of giving, and most important, to celebrate our Saviours birth. 

I do want to share some cards as well. These were made when I took the class over at 2Peas for Holiday Thinking Inking.  I had so much fun making these and really needed to share before now, but I have had a sick kid and hubby.  Then I got sick with the stomach flu bug too.  Then everyone was doing well, but then I woke up on the 16th with a head and chest cold. Soooo therefore, things were delayed, but we were all ready for Christmas day, thank goodness!  Lol!


This card was made for the Holiday Thinking Inking over at 2Peas and for Hero Arts Contest. I loved the way this Paint Resist Technique turned out. I cannot believe how much texture this gave the card. I actually applied white acrylic paint on my Hero Arts stamp and then stamped on white cardstock.  Once it dried, I then blended several Distress Inks on various parts of the background. It was then added to wood grain paper and then lace was added to the lower part of the card. I also cut out Happy Holidays in dark chocolate brown with my Cricuit Machine and adhered to the top portion of the card. 

This Hero Arts Florentine pattern was the great stamp that I used and I will add that it would be better to use Ranger Paint Dabbers.  They are specially made to stay wet longer. And because of this your paper will not stick to your wood block.  Yup, it happened to me the first try, so I had to pick up on my speed when removing the cardstock the second time around. You can purchase it for yourself!


And here is another card that I made using Stamping Up Sentiment and Poinsettia stamps.


This card was made with the Textured Paint Stamping technique on the mini Poinsettias. I actually used a make-up brush to run through the paint once it was added to each stamp. Really cool effect. I also used Hero Arts Polka Dots background stamp on the lower portion of this card. I just love how this turned out!


Now before I go I would like to share this one layered card that I made for a card challenge in my Hero Arts Flickr Group.  It is using the ever wonderful stamp set from Sweet & Sassy.  We were to make a card for a 90 Minute Scramble and the card was to be only one layer. Now we could layer our stamping but not other papers.  Seeming that I celebrate the birth of Christ for Christmas, I decided to use this stamp from Sweet & Sassy that I won in a Blog Hop of theirs back in October, for this fun challenge.  The Greatest Gift Clear Stamp Set.  I also used this Hero Arts Bold Florish stamp with this card.


Now making a one layer card was very difficult for me, but I played around with some techniques that I learned from my friend Jill. I am happy with how it turned out, but would still love to fix it up some more with dark blue ink and to add more darker colours around the couple instead of that Yellow hue. I wanted it to appear that there was an Holy Light shining down upon them, but it turned out that the colour of the distress ink and watercolor yellow was almost the same. Oh well, I will have to give this another try I guess.   I was going for a magical night in Bethlehem scene and wanted it to portray the special meaning behind the birth of Jesus.  Now that the card is completed I have since thought that I should add 3 crosses in the hills in the background to symbolize not only the birth of Christ, but His sacrifice for us.  I didn't get to add it, but will try this again for sure and will make that a part of the drama unfolding in this card scene.  Anyway, this is what I came up with. Hope you like it!


May the Christ of Christmas
fill your heart & home with love, joy and peace
that will last beyond the season.


Thanks so much for dropping bye and for being here with me along my blogging journey.  I so do appreciate you and your company!  Praying that your Christmas is and was a season filled with much love, happiness and most important, wonderful joyous memories to share for years to come.

Blessings to you my blogging friends.
Dana

December 9, 2010

Signs of the Season


It’s almost a given that at some point, a poinsettia will be seen or added to your holiday. Just as other Christmas symbols like Baby Jesus, Santa, Candy Canes and Snowmen, the bold poinsettia is a much desired symbol of the season.

There’s many wonderful reasons to want to welcome this popular potted plant into your home. With minimal care, it will go the distance from the beginning of the season to when you ring in the New Year and far beyond. The red “petals” of its star-shaped flowers are actually long-lasting bracts, or modified leaves, that don’t soon wither the way ordinary blossoms do.

The flower's beauty and longevity are worthy attributes, but there’s another aspect to the overwhelming popularity of this plant: Clever marketing by a single family of horticultural entrepreneurs firmly established this species as an icon of the holiday. Did you think that an exotic plant living in obscurity until the 19th century could become an icon of Christmas past, present and in the future, all on its own?

The legend of this amazing flower comes from Mexico.  It tells of two children, a boy and girl who want to present a gift to the Baby Jesus in the manger scene in the town village church.  Each year the children would look forward to the town's Christmas festival. Many times there was never enough money to buy presents to bring to the baby Jesus and so this year they set out to town to join in the festivities very sadden.  They wished with all of their hearts to lay something before the baby Jesus just as the wise men did so many years ago, but they came empty handed.

Another year was almost over and it was now another Christmas season.  Christmas Eve was now at hand and the young children set out to attend the service at their church.  On the way they saw some weeds growing along the road and knowing that they had nothing else to give, their little hands picked the best weeds that they could find.  This would be their gift for Baby Jesus!  When they were seen bye the local boys and girls they were teased and taunted.  They did not care for they knew that they gave all that they could, but also gave with their heart.  It is said that once these two children placed the green plants around the manger scene, that miraculously, the green top leaves turned to brilliant jeweled red petals, and the manger scene was surrounded bye beautiful star-like flowers and so we see them today.

This is a wonderful legend and really does give this amazing flower a new place in my family Christmas  tradition.  Having a Poinsettia present in our home just comes naturally each year , but was always purchased  because of it's association to the Christmas Season and not because of this touching story your read here today.

A story of a profound need to give and to extend this gift from all that one has to offer.  Better still, of the acceptance of such a gift, one that looked like mear Refuse in the community's eyes, but to an Almighty God, a gift of gratitude and thanksgiving. So in return and acknowledgement of such a tender and heartfelt offering, the genuineness of the offering made this gift become a treasure and beauty for all to see.

Wow!  What a reminder that the season isn't about the boxes and bows, the high tech equipment, the food that we eat even when we dont' need to, but about GIVING!  True and honest giving! Not with all that we want to give, but truly giving with all of our hearts, and only out of our means and not what will be future debt.  We strive and most are guilty of trying to out give, but all that really matters is that you give what you can and with a cheerful heart.  Maybe this Christmas you can make that giving to be of something that is not tangible or materialistic, but of your time, your patience, or maybe just the kindness of sharing a hug or smile, or when you pass someone on the street who looks cold and needs some gloves, give them yours. I don't know about you, but for us, we often go through our belongings and make sure to pass them along to those in need.  Not things that are worn out or no good, but really gently used items, things that will truly make a difference.  Maybe there is someone you know who will not have a Christmas meal this year, or a neighbor who is lonely!  Why not extend that hand of giving and set an extra setting at your table, or make up another plate, wrap it and take it to someone who maybe ill or shut-in!  I know there are so many areas that we could reach out to others, but in a world where we all can get so caught up in ourselves, we must stop so that we really can see those who feel like we have stopped looking!  I challenge you to make a difference, great or small, in the lives of someone in need this Christmas. 


In keeping with my story of the Poinsettia, I want to share a card that I made using one of the Techniques I learned at Holiday Thinking Inking.  I sooooo love how this card turned out.  This card is using the Paint Resist technique, one of my favorite.  I used the ever beautiful digital image of  "Beauty of the Season" of Deedee's Digis Store.  I actually went into my editing program and enlarged it to a desirable size and printed it out on watercolour paper.  It was then coloured with Ranger Distress Inks, and stamped with the Hero Arts "Friends Def." and then I added Liquid Pearl to give it some shine.  I also added Glossy Accents to the gems to give the jewels some more dimension.  The card back ground was stamped using the Hero Arts stamp called "Bold Flourish" and I so love how it turned out on this colour of cardstock.  Yes, I know that the colours are not traditional colours but that flower is just amazing.  The added touch of outlining the flower with Liquid Pearls is a little tip I learned from Jennifer McQuire!  You can do it with a Bisque colour Liquid Pearls also, but I did it with cream and just brushed over top with some watered down walnut ink.

I hope that you are all getting things prepared for this very exciting season and that you make this Christmas one that is filled with much laughter, fun & many great memories.  Don't forget to take loads of pictures. Lol!

All the best my blogging friends!

Hugs & Christmas Blessings
Dana

December 8, 2010

Hero Arts Blog Hop


Just wanted to share some news about a very exciting Hop that will take place soon. Here is what the team over at Hero Arts Blog had to say about the event!

"You’re invited to join us on Friday, December 10th for a fun-filled, inspiration-packed blog hop featuring ALL NEW stamps from the upcoming 2011 Hero Arts Catalog!


We’ll hop between the blogs of more than 20 Hero Arts designers and friends, previewing the new stamps and sharing idea after idea. You’ll be able to leave comments along the way for a chance to win fabulous prizes — 2011 Catalog stamps, of course!


We’re so excited! We can’t wait for you to see everything!! So come join the fun — it all starts right here on the blog the morning of December 10."


So make sure to check out all the fun on that day and a chance to win some prizes too!

Hugs & Blessings
Dana


November 27, 2010

For The Love Of Snowmen!

Snowmen have always been something that I have loved. It maybe one that is cute, whimiscal, or just have a country look to it, whatever the case I am hooked.  Lol!  I have over the years collected snowmen ornaments and paintings, and have also taught others to love them too!  I actually had taught a Tole Painting class many years ago and the project that the class completed was a Winter Welcome Snowman. 


All the students completed this snowman project over a 4 week period and it was so fun to see all of their hard work payoff!   Isn't he just gorgeous!  I so love country style and this guy fitted right in with my Christmas/Winter decor.

So I saw a lot of different challenges for Christmas and Winter Cards/projects. So I thought that I would make an altered project.  I made the following wreath for my Secret Sister at my church ladies' group.  Our big reveal will be on Dec.09th and to my knowledge, she doens't follow my blog. So with needing a gift, and wanting to do something with snowmen, and to submit for challenges, this is what I came up with! 

This Project is being submitted to the following challenges: 


I used Hero Arts stamp called Snow Globe and actually scanned a stamped out image to make the larger image for the center of the bow.  Now this is a lot of work and a lot of fun. I had to use so much glitter. Here are some close-ups to show you what I mean! Lol!

Center Snowman

Snowflake Minis ( These can be made separtely and attached to gifts or even to give to teachers for a Christmas present. You just would need to add a sentiment to the side of the snowflake and Voila! A great gift! I bought a dozen snowflakes at Wally World for two bucks and just coloured and glittered the snowmen. Then glued them to the snowflake and then adhered it to the wreath. Real simple!


And now for the blue coloured snowman. Sorry but this one is a little blurred.


I really had so much fun making this, but the glitter will still be flying for days it seems! Lol! It is funny because when I went to get my son from school one of the Moms wanted to know why I was so sparkly and glittery! Lol!  I so love "how glitter does give any project so much glam and glim! It really can bring your projects to life.  So why not give your projects that extra boost with some fanciful glitter.

Thanks so much for dropping bye and I hope that I have inspired you to make a gift for someone or maybe for yourself.  I trust that you are doing well and that you are making memories each day with your family and friends. Memories that will last a life time.

I better get going!  We are putting up our lights outside in a little while and then it is off for "Family Fun Day" with my son's school. We are going skating and then it is back at the school for supper. Then the entire school well be checking out the Santa Claus Parade together with hot cocoa and cookies. Yummy! Sounds like a lot of fun and I can't wait.

Hugs & Blessings.
Dana

November 26, 2010

Wee Memories Challenge

Hi Everyone:
Just wanted to share with you the card I made for Wee Memories Challenge. Here is the Challenge Prompt.


The Challenge is to use Pink in your card creations. I needed to make a card for a friend and thought that I would make it also with this challenge in mind.  I so love the use of butterflies on my cards and this Flutterbies from Hero Arts is just one of my favorite Digital Kits of theirs. It can add so much to a card without there being a need for a lot of embellishments.


Making this butterfly come to life is so simple as adding Ranger Distress Inks, adding white gel pen, and of course, adding bling!  I actually have butterflies in various colours completed this way and saved in a zip-lock bag, for those days that I just need a little something to add to a card or make a quick but pretty card. 

Thanks for stopping bye. Remember you can still play with this week's Wee Memories Challenge, but a new one should be up later tomorrow sometime too. Thanks for dropping bye.

Hugs & Blessings
Dana


November 23, 2010

Cricuit Creations - Loads To Share!


For All Your Die Cut Challenges !

 I was given my Cricuit Machine over two years ago and I am ashamed to say that I don't use it so much as I should.  I know my hubby doesn't get upset about it, but I am sure that he wishes that I would utilize this resource more than I do.  So for further encouragement and support, I met a wonderful lady name Leanne while I was a Design Team Member of Deedee's Digis Company.  I was so enthralled with the fact that any dimension or depth that was added to her cards and altered projects, was largely due to the fact that she added many die cuts.  These die cuts were cut out with her Cricuit machine and she always adds something extra to even provide more texture or dimension. Her work is outstanding and to show you what I mean, just look at this at this Masterpiece! Make sure to check out her link above to see all of her amazing projects. She has a wide group of followers and once your there you will know why!

Featured With Permission

 After much thought and searching through my SVG Files, I decided to get back into using my SCAL Program. Well some of you might be wondering what that really is and how it works.  Well, I will try my best to explain.  For someone like myself who is on a tight budget, I decided that once in a while I would purchase a Cricuit Cartridge but only when they came on sale. I am sad to say that I haven't seen an whole lot of them that are inexpensive to begin with, so therefore I would have to always wait for what I needed to go on sale. So to make a long story short, I heard about SCAL ( short for Sure Cuts A Lot Program) and the more I researched it the more I felt it was right for me and my budget.  I will try to provide you with an explanation of what this program is and how it works.

Sure Cuts A Lot is an extremely easy program to allow you to cut your True Type fonts, SVG Files, and various shapes on your Cricut Machine. This software will allow you to create your own designs by using an on-screen virtual cutting mat as your workspace. The on-screen mat will prove to be very powerful and useful, as you can visually see all of the shapes laid out on the mat, before cutting anything. Once you have everything laid out the way you want, simply choose "Cut With Cricut" from the "Cricut" menu or click the Scissor toolbar button, and the Cricut machine will start cutting your entire design.  The on-screen virtual cutting mat allows you to adjust the properties of each shape laid out on the mat. Simply select a shape on the mat with your mouse cursor and it will be highlighted with 8 blue circular selection handles. These handles will allow you to set the position, size and angle of the shape, just by click and dragging one of the handles. 

Some of the Key Features of Sure Cuts ALot are:
· Works with the Cricut Personal and Cricut Expression Machines
· Works with your installed True Type fonts
· No special cartridges required
· Cut additional shapes from the Sure Cuts A Lot Library.
· WYSIWYG Interface - What you see is what you cut
· Save your design layouts, so you can save your work to allow you to make changes over time


Vector Files or SVG Files of many varieties can be used with this program. These files are really just commands that are sent from your computer to your Cutting machine and cuts out what you need, which is faster and more time efficient.  I need to add that you do need a USB Port 1.1 or 2.x cord to connect both your computer and cutting machine. I have loads of files to help me cut out what I need, wither it be a set of tags, flowers, or just words.  Whatever the case I always have my files. I also make back up files so I don't lose my orginals and save them on a memory stick. I purchase my files from a variety of places and the things that are free on-line is amazing. For example I get a lot of files from places like http://freesvgs.blogspot.com/  I love this site so much. There are files that you can purchase also, but she also gives so much away. There are over 400 followers right now and growing.  I do want to add that she is an affiliate to Sure Cuts A Lot, and does get a small commission if you purchase it using her link on her site. She will also convert any personal images that you may have into SVG Files for just $ 4.00. A really great deal.
This is one of the images that I recently got there and I think it really sets the scene for what I want my Christmas cards to look like this year.


It is just beautiful and so precious!  The selection is so great and she really does share so much with everyone. I actually found a Elvis Presley file at http://dscrapbookingroom.blogspot.com/ another great site, the other day. I almost cried I was so happy. Yes, that is sad, but to know that I could get it for free and not have to pay $30.00 or more was a blessing. The creator of these files are just so talented and I am so thankful for folks like them.

So I guess you know where I am going with the The DieCut Divas Challenge site picture at the beginning of this post right! Lol!  Well, I joined this group a while back and the ladies there are just wonderful.  Right now they have a Christmas Challenge on and it extended to include both November and December. Make sure to check it out. You can even join our Flickr Group and join in the fun.  It doesn't matter what kind of Die Cutting Machine you have! Each month there is a new challenge asking you to use Die Cuts in some way or another. And of course there is always prizes. Lol!  Just make sure to click on the link below and it will take you to their Flickr Group page so you can sign up and have loads of fun.

We like the way you've used your Die cutting system! You are INVITED to post it in Die Cut Divas

Here are some cards that I made for this month's challenge. They are nothing extra special but cute just the same. I haven't been feeling well but still needed to make a few cards and this was the fastest way to do it. So here are my Christmas Minis.


And here are some close ups of each individual card. These were all cut out on my Cricut using the SCAL Program and svg files.  I would like to add, that if you do decide to purchase this program that it is best to buy the newest and latest version. A lot of the files that you buy are made for the latest version. I really need to up size to the new one due to the fact that it was a little more tricky to use these files that made these cute mini cards. Due to the fact that I have a husband who is a Saint and helped me to re-do some sizing issues, these cards are being shared with you now!

Santa's face was shaded with dark peach chalk and the white parts with grey.

Antlers where shaded with Ranger Walnut Ink and cheeks rubbed on with pink chalk.

The Penguin's face was chalked with grey and cheeks with dark peach.

Snowman's scarfed was stamped with a mini snowflake from Stampin Up.
The blue background was stamped using Hero Arts Cling Dot stamp.
Shading around the head was with dark grey and cheeks with dark peach colour chalk.

So there you have it folks, mini cards that were much faster to create, than say if I had to cut them all by hand. These are so great for teacher gifts, or for little kids. You could actually use the Penguin and Snowman for invitations for those birthday parties that fall in the winter months. 

I am so happy that you are here and I hope that on this visit you learned something new, and that you were inspired to use your cutting machine that maybe just sitting in a corner, waiting to be used again. They really are wonderful tools if you just take the time to research things a little, and practice, practice, practice. Lol!
Yes, I know! One minute I take a break and the next minute I don't know when to let you go! Lol! Well, I will bid you ado and say "Sweet Dreams"  Thanks for dropping bye! I so do appreciate you being here.

Hugs & Blessings
Dana

November 19, 2010

Deedee's Digis Blog Hop

I just wanted to let you know that I haven't forgotten about you!  I have some personal things going on this past week which really took the wind out of my sales and I have been trying to deal with it positively!  Though I well say it has been very difficult!  So today after getting a very encouraging talk from my 12 year old, I decided to pick myself up, brush myself off and start over again. Well not really start over, but try to put things into perspective. Sometimes life can toss us some curve balls, and we become overwhelmed.  I guess that is where I am right now, but I am trying to stay positive and to continue to place my trust in God through His Son Jesus Christ. Anyway, I say all of that to say that I have missed you all, but have had to take a little break.  I do have several things/projects to share but just haven't gotten to blogging about them yet.  I am going to be sharing some more projects from the Holiday Thinking Inking Class with Jennifer McQuire and also share some projects I have been trying to finish for the Hero Arts Contest Second Round.  I trust that you are all doing well and that God is blessing you with much happiness, good health, and love of family and good friends. 


I just wanted to share that my good friend Deedee is having a blog hop today over at her site.  I have to say that I truly miss this lady and her team of great gals.  I see that she is really busy making some great Christmas digis and I can't wait until after supper to go check out her store.  So make sure to head over and check out all of the amazing projects her team has come up with. Most importantly make sure to comment when ever you can because there are prizes and giveaways too! 


Thanks for dropping bye and for sticking with me. I do really appreciate it!  For you who really believe in the power of prayer, I do so covet your prayers right now and if you could remember me that would be awesome. Health issues are the real concern right now and when I feel comfortable enough to share I will, but right now my heart is heavy and I am just praying for some direction and guidance. Just so you don't worry to much, I don't have any life threating disease, not that I know off and which I praise God for. Anyway thanks again for staying and I hope to see you again soon.

Love & Prayers
Dana

November 10, 2010

Where Will You Be On The 11th Month, 11th Day and at the 11th Hour?

Lest We Forget
Will for my family and I, we will be attending a community ceremony to celebrate, honour and remember those who have played an important role in the freedom that we enjoy from day to day.  So many of us have been touched one way or another by war.  Maybe it is through a connection with someone who fought years ago, or maybe it is knowing family members or friends who are in the military now.  Whatever the case, there will be many whose hearts will be heavy and some memories will be sad and some happy. I think now of my own family and how my own nephew just got back from overseas just this past spring.  It is so sad to hear how he witnessed the death of a friend and now lives with that terrible memory each day.  When so many have died in battle it isn't difficult to ask the question why these things happen!  Some people dispute the fact that our soldiers are in foreign lands in harms way  - fighting for a war that isn't even theirs to fight.  Well that maybe be true, maybe not!  Whatever the case they are still away from family and friends. They are still in danger, still trying to make a difference in the lives of others and still needing our love, prayers, and support.  I want to thank these brave men and women who have fought and many who have died, so that I may even have the freedom to share with you through this blog.  So on a day that is so important to so many, why not attend a community event to honour the men and women who have died for your country.

In honour and respect for these men and women, my son's school had asked me to come and help them make Remembrance Day Cards to share with some of the War Veterans in our community.  I was so inspired to see how much these young kids really enjoyed the craft, but more so I was so touched by the stories that they shared and how proud they sounded when talking about their relatives. Something to be proud of indeed!  So here is a sample of the card that the class made. Here is the one that I made and has you can see it is made with construction paper. For anyone wanting the pattern for this Poppy Flower just leave me a comment with your email addy and I will send you the pdf file.  The flower can be any size, I wanted it to be front and center stage and that is why it is large in size.


I wanted to take this time to say a Big Thank You to my own family members who have been on several missions. They are more brave than what I could ever be and for this bravery I am honoured to call them my family. I also wanted to share this video with you as well.  It is just a reminder for us Canadians of the sacrifice that so many of our military men and women have made to protect our country and others abroad.  Thank you so much for stopping bye. And may this Remembrance Day be an opportunity for us all to think about our blessings and to hold our love ones a little tighter.


Hugs & Blessings
Dana
  

November 8, 2010

Feelin' The Moxie

Diggin The Damask is the challenge over at Moxie Fab and I am so happy that I found the time to get to complete this challenge.  Now here is an image to help you dig the Damask style. You can be inspired by more Damask pictures and read all about it here.


Aren't These Designs Beautiful!

Also, the gals over at Everything But The Kitchen Sink are having a great colour challenge.  The colours are white, grey, teal or turquoise.  I so loved this colour scheme and it was great to use last week's Faux Letter Press Technique that Jennifer McQuire was teaching in her class at 2 Peas. I so loved using my new Damask Cuttle Bug folder.  I also used my Hero Arts Friends Definition, Stampin Up sentiment, and Damask stamp.  I have to admit that I had this Damask stamp a very long time ago and cannot remember who made it.  So if somone remembers please let me know! Lol! Thanks


To find out how to do this technique where you use embossing folders and acrylic paint, check it out here.  You will find it so easy once you start, but I will say that it is best to use Ranger Paint. I used sparkle paint and it really did dry to fast.  This did cause some problems with both, paper sticking to my folder and also with trying to clean the paint off embossing folder.  I didn't have the Ranger Paint so I had to improvise. I still love the shiny effect of this paint and I am glad that it worked out. I will be back again with more cards tomorrow. 

Thanks so much for dropping bye.  Hope your week is going great and I pray that your area isn't drenched in rain like we are here in the Maritimes.  I am starting to fell a little like Noah! Lol!  Well, that is it for now. Sweet dreams!

Hugs & Blessings
Dana

November 3, 2010

Holiday Thinking Inking Week 3

Just wanted to quickly share the cards that I made for Holiday Thinking Inking class with Jennifer McQuire.  This week we learned how to make embossed flowers,  a snowflake embossed background, and how to emboss a background with a background stamp and then ink overtop of it.  I will admit that my cards took some time to come together.  Here is my card with embossed roses.  I used Basic Grey Paper to make my flowers and embossed them with UTEE ( ultra thick embossing powder) and added some curly-q's and leaves that I made out of prima flowers.

Close-Up

Next was the technique where you take a background stamp and place it into versa mark or any other embossing watermark stamp pad, and then stamp to your paper. Then add white or clear embossing powder. Once this has been dried with your heat gun or dryer, you will get a very cool raised effect. Then it is time to take out the distress inks and ink overtop.  I first stamped my snowman image on my card before I did my stamped background.  I just simply masked off my stamped snowman image and just embossed over top. When everything was done,  I just removed my masking paper and coloured in my snowman's scarf and mittens. Once this step was completed, then I took Broken China distress ink and sponged all over the background. I actually covered my snowman again so not to make him blue with the distress ink. I added the pink gems and bow, along with my sentiment.  Once this was done my card was complete. I really loved doing this effect and I think my card turned out great.  


Now the last technique was one that I really had a lot of trouble with and I am not overly pleased with this card. Also, no matter when I took the picture it seemed like my snowman had a green hue to what suppose to be white embossing. So with this technique you really need to do it on light pattern paper. I will tell you that if you don't, the colour of your distress inks may not appear as they should.  I used a very light green patterned paper and inked Broken China overtop, but it didn't work like I had hoped it would. Sorry!  So please check out how Jennifer does this technique here.  Once you see it you will know what I mean about using lighter printed paper.


Close-Up

Right now Holiday Thinking Inking Class is into it's 5th week and yes, I need to share the cards from the 4th Week with you. I did not submit my cards for the contest for that week because I am so slow it seems.  But it was a class using acrylic paint and I just loved this class. Being a past painting instructor for what seems like a very long time ago, I just love using acrylic paints and it is so fun to see other ways to use these mediums.  Make sure to check out this week's class over at 2 Peas here. You will be so glad that you did because this week we are using Alcohol Inks.  So many cool things to see and do. 

Thanks so much for dropping in and I hope that you have been inspired to try some new techniques while you are making your Christmas Cards. I trust that all is well in your part of the world, and pray many blessings come your way.

Hugs & Blessings
Dana

October 31, 2010

Holiday Thinking Inking Week 2

Hi Everyone:
Just wanted to share with you the cards that I made for the challenges that were presented to our class in the Holiday Thinking Inking Class with Jennifer McQuire.  Please do not feel that you can't take part because you still can. You may have missed a few classes for chances to win prizes, but you can still submit cards using those techniques along with this week's techniques.  Just make sure to submit it to week 4 okay.  It needs to be uploaded to their gallery by Nov.1st.  It is always great to win scrapbooking supplies, but I have to say that I am just as happy to learn new ways to use my stamps and to get more bang for my buck.  So here are the cards that I made, including close-up shots.

The first technique that Jenn taught us was called Block Background. This is when you use an acrylic block to make your very own watercolored background.  This was a little tricky but after a few tries I got what I wanted!  These techniques work the best with Ranger Distress Inks by Tim Holtz.  Why you might ask?  Well they are made so that you can use them like watercolours,  which really comes in handy when doing a technique like the one used in this card.  I had a friend ask about exactly how this is done so I will try my best to explain it to you.  You take any size acrylic block and you cover it with various distress ink colours. Once you have the desired amount, you than spritz it with water. Depending on the effect your going for, you can either spritz close to the surface, which will give a more pooled water effect, or spritz further away, which is what I have done here. The closer the bigger splotches, the further away, the smaller the splotches.  Hope this helps.


Close-up Shot!  Sorry about the frayed ribbon here, but my scissors became dull apparently! Lol!


I used Broken China distress ink and Stampin Up chocolate chip brown. The stamps used were from Autumn Leaves, Stampin Up & Hero Arts.  I really love how this turned out.


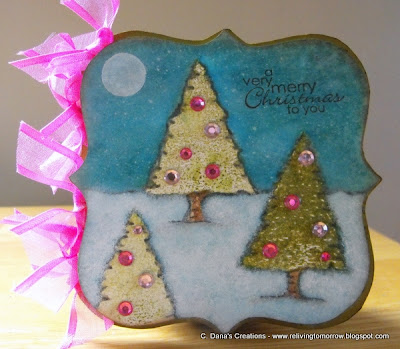
This next card maybe small in size but there were many techniques used here. The background was first watercoloured in Broken China. Then splattered with watered - down white stamping ink. The trees were then stamped in a technique that Jennifer McQuire calls Generation Stamping. This is where you ink your stamp once and then continue to stamp until all the ink is gone. This is the technique used here to stamp the trees.  I then dipped the end of my Mister bottle in white paint to make the moon.  I then shaded around and above the trees to create the feel that the trees were in front of the snow and sky.  I then did a Painting technique to create the snow called Mopping/Stippling which gives such great texture.  I then stamped the cling dots to the green background and distressed the edges.  Liquid Pearl was added to water in my Mister bottle and then I misted the entire card.  I then added the sentiment and ribbons. This was so much fun to create!


Close-up Shot!


This shot really shows how wonderful spritzing Liquid Pearls can be on your cards.
It gives such a warm and glimmery effect.


Now this next card was one of my favorite cards to do.  Here I did the "Bleeding Technique" that Jenn taught us.  I decided to do it on a bigger stamp surface and I am so glad that I did.  I used this wonderful Bold Flourish on my card.  I just loaded the stamp up with different fall colours and stamped it on my watercolour paper. Then stepped back a little and spritzed it with my Mini Mister. The effect was amazing.  I then added Ultra Embossing Powder to it to give it more dimension and then inked all around it.  My background was stamped with the cling dot stamp and inked around the the edges and center to tone down the brightness of the paper.  I so love the colours here and that ribbon really helped to make this card look elegant.


Close up to show the bleeding of inks and to show embossed texture.


These cards were so fun to create and the fun is not over yet.  We are on our fourth week now and I will share pics of  weeks three and four with you early this week.  I trust that you are all doing well and spending some time together enjoying the fall weather.  Thanks for dropping bye and hope to see you again soon.

Hugs & Blessings
Dana

October 25, 2010

Victorian Whimsie

Hi Everyone:
Just popping in with a card that I made for some challenges.  I thought that I would take this very whimiscal Santa Claus and make him into a Victorian Saint Nicholas!  Lol!  I did this bye colouring his suit a deep purple. Yup! Purple!  I know some of you might not like that colour, but when paired with green, especially olive green,  it looks rather elegant.  I was going to submit this card for Deedee's Monday Challenge, but I was too late trying to upload it.  I was to slow it seems to beat the new challenge which is now up. You can find it here.  This card was also made with other challenges in mind.
I used Deedee's Digis stamp called " Be Jolly".  I have to admit that this is now my favorite Christmas digi of her's so far, but if you check back in again you might find me saying that I changed my mind.  There is such a variety in her store that you may never have just one favorite!  Lol!  I have so many I have lost count!  Lol! 

This card was based on the Sweet Stop sketch for today. It really is a great one and I had fun using it. 


Here is my take on this wonderful sketch.


I would like to submit this card for the following challenges:
Sweet Stop ( Sweet & Sassy) - Sketch Challenge SSS79
Weekly Christmas Card Challenges - Week 47
Stamp Something Challenge - Use A Digital Image
Bah! Humbug! - Challenge 41 Elegance
ABC Christmas Challenge - V is for Vertical!

I had a lot of fun making this Victorian style card.  I added purple lace, flowers, and ribbon to this card to give it a more elegant feel.  The image was printed on water paper cardstock.  I want to point out that it is best that you use flat watercolour cardstock rather than the textured. That is what I used here and I found that at one point the ink was starting to peel!  It isn't a big deal because you can go in and do touch-ups with a black journaling pen or copic marker.  Black markers can work miracles!!!  I hope that I have encouraged you in some small way to not be afraid to use your digi stamps in new ways. To step outside of the box!  With the right embellishments you can make one style seem old when you try something new! 

Thanks for dropping bye and I hope that your week is off to a good start.  Remember that a frown is a smile turned upside down.  Keep on smiling!

Hugs & Blessings
Dana

October 15, 2010

They Are Here! Hooray!

Yes! My goodies that I won from Hero Arts are here and I was so excited to get them. I actually got them on Friday past and didn't get the chance to get a pic because some of us in this house were not feeling to good. Anyway here they are and I did get a chance to use them already. The quality is fantastic and for more ideas on how to use these stamps just click on the Holiday Thinking Inking button in my sidebar. Jennifer McQuire is an expert on how to use these stamps and she shares some very clever tips and techniques to help you create wonderful Christmas cards. Okay without further ado!


I made another card last night but will share it in another post.  Aren't these wonderful.  I can't wait to use the snowman.  He is so cute.  Be sure to check back to see what I create with these gems.

Okay I did want to share with you an elegant card that I made for a lady who is in one of my Flickr groups.  She just recently got married and we all made a card for her in an on-line Bridal Card Shower, which I thought was an amazing idea.  So here is the card that I made for Jenny, along with some upclose and personal shots. Hope you like it. The card was made using an embossing folder that was stamped with the friends definition first and then I ran it in my embossing machine. It was then distressed and the embossed areas were inked. The die cut was a free one I found on-line. I added sheer ribbon to the dress to give it that feel of real material and I added a pearl necklace. There were so many things added to this one and I can't remember them all. Lol!  I will let you see for yourself because the pictures say it all!


 So there you have it! I really loved making this one though it took me what felt like forever. I have to say a shout out to my friend Ceal who was my secret pal over at Deedee's Digis.  She gave me the blue jewels and the rhinestones that are around the bow. Thank you my sweet friend. These were a great addition to this card. I love stamping but I must say that I am finding some really great die cuts that are great to use in cardmaking as well.  The funny thing about this card is that when I made this card for Jenny I didn't even know what colours she was having in her wedding. And when I saw her pictures today it was so great to see that she used the same colour of blue as I did here in this card!  How great is that!  I will chalk it up to divine  intervention!

Okay that is it for me my friends.  It is raining cats & dogs here today and it is making me feel a little down.  It is even a little chilly here!  Fall weather I guess!  I can't complain and I won't, because won't be long before the flakes will be flying!  I trust you are all doing well and keeping busy!  Not to busy though for family and friends and for those times when you can just make someone smile.

Hugs to you all!
Dana

Copyright Notice

All the contents of this blog including but not limited to designs, concepts, and photographs are COPYRIGHT 2009-2014 Dana Colbourne. I have put a lot of work in these creations and would appreciate that you use them for inspiration and enjoyment. They are for personal use only and they are not to be copied or used for publications or contest. Thanks for stopping by and supporting me on this fun journey!