


Seeming that this Sunday will be Fathers' Day, I wanted to share some cards that I made with a masculine style. With cardmaking there sometimes can be challenges. Maybe there might be styles that you do not master very well, or sometimes you have what appears to be more female oriented stamps to use than any other lol! Well for me I have to really think long and hard when it comes to making cards for the special men/boys in my life. I was determined to take on this challenge and this is what I came up with! Now I want to share these with you! So for the next 3 days I will share some cards that will hopefully inspire you to get out your stamping supplies and make some Male Cards for that special man in your life.
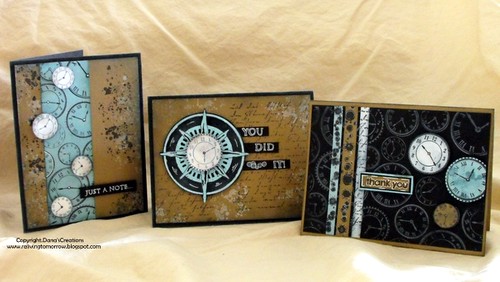
The first card we will focus on is the " You Did It!" card and share the details.
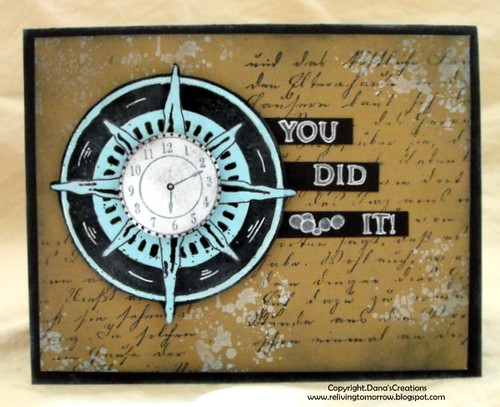
I started this card using Recollections Kraft paper and the Paint Splat Clear Stamp set/Recollections with whisper white pigment ink/Stampin' Up. I applied this stamped image in various places. Concentrating mostly in the corners and around the bottom portion of the cardfront.
I then took Basic Black Ink/Stampin' Up and a Ranger Blending Tool and blended ink around the edges of the kraft paper. The Old Letter Writing Stamp/Hero Arts was used with black ink to add text to the background.
Next step is to make the Compass! I took light teal blue cardstock and placed the Tim Holtz Compass Mask overtop. The mask has an adhesive on the back so it can stick to any surface, but still be removed later. Then I sprinkled Black Embossing Powder over the entire surface and then shook off the excess. Once this was completed, I slowly removed the mask being careful not to pull up any of the embossing powder. Then I used my heat gun/Marvy to set the embossing powder. The embossed image was then cut out and placed on the card front with pop-dots.
A clock image from the Time To Stamp set/Hero Arts was then stamped with Broken China Distress Ink/Ranger on white cardstock and placed in the center of the compass embellishment. To add my sentiment to the card, I stamped the sentiment "You Did It!" on mini strips of Black Cardstock/Bazill and stamped paint bubbles to tie it all together.
This was then added to a folded piece of black cardstock which was my card base. Most card base sizes are usually 4.25" x 5.5" sometimes a little bigger. Such is the one in this post, but there is really no rule saying that you can't change it! Whatever size you want is fine, as long as you can get an envelope to fit the card.
You can make your own envelopes using tracing templates and cutting them out by hand. Even better, if you have a cutting system like a Cricuit or other cutting machines, you can cut your envelopes that way.
I know that there are some of you who follow and are not card makers. So if of you are wondering "What Masking really is all about?" than Tim Holtz is the person to explain it! He can explain it so much better than me and does so in his video.
This is the completion of my first card from this set. I hope to see you back here tomorrow when I share the next card from this series of "Cards For Men." Until then, take care & sweet dreams.
Hugs & Blessings
Dana


5 comments:
These cards are just fabulous, Dana! Love the way each one turned out!
Dana! I think you've really found your niche with these! They're terrific!!
These are gorgeous!
Beautiful cards! Love the masculine style of these! Thanks for letting me know that I won the Summer Card making class on Joy's blog. I had not seen that yet! You rock! :)
All three of your cards are gorgeous! Your colour combinations are so rich and deep and even though you used the same elements and papers, they are all so different!
Thanks for sharing! :)
Post a Comment